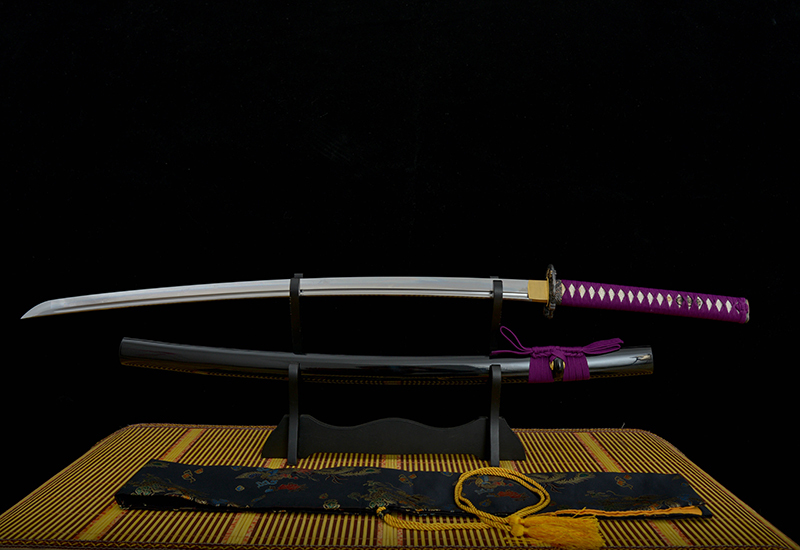
Monday 14 March 2016

Katana Sheath Strap Experiments.

This is an example of the straps that was created on my sheath for my Katana, one of my tutors showed me how to do this so I can experiment and find the right pattern and design for the strap so it fits my Katana design. To do this I first have to highlight the faces I want to use, then I extrude these faces outwards until I am happy with the thickness of the strap I want. After this I then extract it to make it its own object and make it separate from the actual sheath. I then bridge back the missing faces so there are no gaps in my sheath, after this is done I then experiment with the straps using the soft selection tool to curve it and move it about until I am comfortable with the design and feel like it fits with my Katana design. I will try to design the strap on my sheath based on my final design I created in Photoshop.

This is my final product of the strap that I created in Maya for my Katana. I also added some extra straps to make it look like there was a knot on the strap with the straps hanging down. I also made a slit in my sheath for where the blade would fit to add extra detail. To do this I first used the multi-cut tool and added more dimensions at 80% by holding down the shift button. I then selected the vertices that I wanted and pressed R for the scale tool, I used this to straighten the vertices. After this I then extruded the edges to create a case inside where the blade would fit into so it’s not just hollow inside. Here is a screenshot to show my work.


Some problems I encountered while experimenting with the sheath strap was, again, I wasn't sure about how to make my sheath strap as I still wasn't very experienced with Maya and didn't know much about the programme. To solve this problem I asked for help of my tutors and this tought me new ways on how to use maya and different techniques that would help me in the future. Some choices I had to make were choices like how I wanted my strap to look like, and where on the sheath it would go.
Katana handle wrap experiment.
For my Katana’s handle wrap I was experimenting and tried to create something similar to final design, however my attempt failed  and I decided to research how to co create something similar.


After researching I finally created a design I am very happy with and I am going to stick to this design as I feel like it fits my Katana very well. 


Some of the problems I encountered with the katana handle wrap was, firstly I was unsure how to make my handle wrap as I was still new to maya and didn't know alot of the tools or their function. To solve this issue I received help from my tutors which then taught me about some different tools and techniques I could use in my model. Some of the choices I had to make for this part of the project was, how I wanted my handle wrap to look like and the style of the wrap, also how big or small I wanted each individual wrap to be. 


Software research

This is my software research, I have looked at how other artists have created a 3D model of a katana, I have created these pages of information about 4 different artists that have also created 3D models of katanas'. I have stated the programmes they have used and how they have used them to create the model, along with examples of their work. 


Asset list

Asset

Time to create
Katana

3 days
Sheath

1 day
Katana carry strap (Wish List)

1 day
Sheath wrap

1 day

Chris Nichols - Artist #1

Chris Nichols is my chosen 3D artist that is involved in modelling and texturing and is based in Vancouver, Canada Chris started out as a prop modeler at Bardel Entertainment on ‘Viva PiƱata’ and has just finished 9 months at CIS Vancouver as a texture artist on the Clint Eastwood film ‘Invictus’. 

Chris Nichols’s work is relevant to my work because Chris is a 3D artist and makes 3D models, and I will also be making a 3D model, which will be my katana. Chris's work has effected my work because of the use of screen effects that Chris has used, an example of this is the lens dirt that you can see on the top left of the image below. This has inspired me to try and use screen effects on my work, one of the effects that I have applied to my model is ambient occlusion, which adds realistic shading to my 3D model. this has taught me to try and add screen effects of possible to again increase the detail and realism of the 3D model.

I chose this person because I am inspired by his work and the models that he creates; my favourite piece of work is, 


This is my favourite piece of work purely because of the level of detail and creativity used in this piece and because of the screen effects used like the particles and lens flares. I also like this model because of the realism used on the face and how photo realistic it looks. This image look similar to some pieces of art that are created by Cal Redback, this person designs art that combines people with nature to make it look like nature is taking over peoples’ bodies. 


Here are some other pieces of work that Chris has created; 


Peter Nowacki - Artist #2

Peter Nowacki is a 3D artist that is from Poland and is currently living in Warsaw, which is the capital of Poland. Peter is currently working at a production studio called Ars Thanea which is also based in the capital of Poland, Warsaw. Some of Peter’s skills include:
  • Adobe Photoshop
  • Autodesk 3ds Max
  • Autodesk Mudbox
  • Pixologic Zbrush
  • Unreal Developer Kit
  • Cryengine3

Over the years Peter has featured in such things as:
  •        Creative Blog
  •          Expose 10
  •          3D World Magazine
  •          Computer Arts Magazine

Peter Nowacki's work is relevant to my work because Peter is a 3D artist and makes 3D models, and I will also be making a 3D model, which will be my katana. Peter's work has affected my work because he has inspired me with the amount of detail he includes in his work, this has made me go over my work and include more little details in my model, for example I have included engravings on the blade of my model for that extra detail. And for more of a worn effect which is what I was originally going for. This had taught me to take time with my work and not rush it, also to include as much detail as possible to make it look as good as possible. 

Peter stated that, “Graphics came to me in a really amazing way because everything stared from fantasy books and games that I used to play with my cousin when I was young. I'm an only child so, in my opinion, fantasy was my way of escape to magic worlds in my imagination.”
This is my favourite piece of work that Peter has produced because of the incredible amount of detail that he has included within this model, like the detail on the actual model of the lightsaber, and all of the detail in the background like the match boxes and all of extra metal pieces lying about everywhere. I also like the effects that he has added like the depth of field effect, I also like the lighting and shading he has used on this model as well as it also adds realism to the work.


Here are some other examples of work that Peter has produced:


Andrea Giordano - Artist #3 

Andrea works on digital art, visual effects, film, texturing and also 3D modelling as well. Andrea completed her Art and Design studies in Barcelona back in 2001 with a masters in animation, Andrea worked for 5 years as a creative designer, Andrea then started to focus on making something more enduring, which as a result made Andrea move to Vancouver where she graduated with another masters with a main focus on character modelling and texturing. 


Andrea Giordano’s work is relevant to my work because one of Andrea's strengths is digital sculpting which is the same as 3D modelling. I will be making a 3D model, which will be my katana. Andrea's work had effected my work because of the use of lighting Andrea has used on the 3rd image below. This has effects me because this makes me want to use lighting on my model as the lighting in Andrea's work makes her model come to life. I think that adding lighting would benefit my model as it would add more detail to my model and increase the realism which is what I am aiming for. This has taught me to try and learn how to use lighting in Maya and other programmes to use on my work in the future to bring my work to life. 

Andrea’s background in art and anatomy and her keen eye for detail has allowed her to follow her passion and work on a variety of different projects on the games, film and TV industries. 

Some of Andrea’s specialties include:
  • Texturing
  • Digital Sculpting
  • Character and Organic Modelling
  • Film and Games


Andrea’s talents have been recognised by many as she has worked on G.I. Joe: Retaliation as the lead texture artist at Digital Domain, Reliance MediaWorks, London. 

Andrea has also worked on:
  • Game of Thrones (Season 1)
  • Great Expectations
  • Sherlock Holmes 2

Here are some examples of Andrea’s work:


Final Design. 
This is my final design that I created on Photoshop. This was my third colour design and my favourite so I decided to use this colour scheme for my finale design as I thought it looked the best.

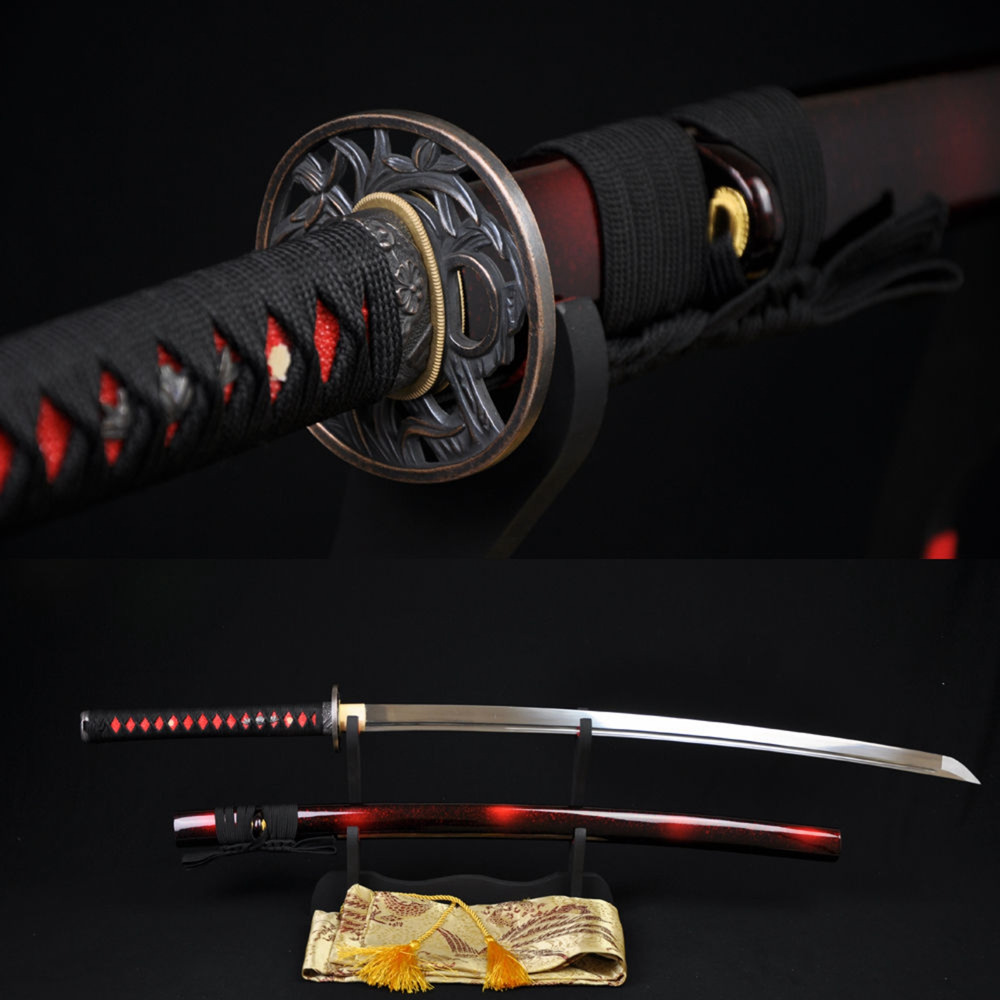
Katana Colour Designs.
These are the colour designs I created using Photoshop, I picked these colours and used the colour wheel to pick other colours to use for different designs and then pick my favourite one for my final design. I made the 2 chosen colours completely different so they would contrast ans stand out making the Katana more eye-catching. Some problems I encountered; I wasn't sure about what types of colours to apply to my ideas. To solve this problem I researched katanas on the internet and then this gave me ideas of what sort of colours I could use for my ideas for my model. Some of the choices I had to make for example were, what colours I could use for my ideas, and weather to go for traditional colours or go with my own colour style.

Colour Design #1

Colour Design #2  

Colour Design #3

Katana Research. 

A Katana, or also known as a samurai sword, is a long single edged sword typically used by the Japanese samurai which is where it gets its name from. A Katana can have many different types of wrapping on the handle which has different meanings and patterns to them. The typical handle wraps that are used for Katanas are the Katatemaki wrap which is also known as the battle wrap. Then there is also the Hinerimaki wrap which is also known as the normal wrap as this is the most used wrap for Katanas.

The most common place to see a Katana is a museum as a Katana is classed as illegal in some countries like Japan for example for ordinary citizens, to own a Katana in Japan you need to register with the ‘Nihon Token Kai’ (Japanese Sword Association), and the swords must exhibit historical and or cultural significance.

The Katana started around the 1400’s and was originally called ‘Long swords’ by many people to start off with, then gathered the name Katana later down the line when samurai started wearing their Katanas ‘Katana style’ which is the traditional way of wearing a Katana which is worn with the signature facing away from the wearer.

Katanas are traditionally made curved, but there are other ways of making Katanas. This is because the Katana is a weapon of war and soldiers would use the Katana during the Japanese civil war and Japan’s invasion of Korea, the samurai armies had 3 main weapons, the spear (yari), the matchlock and the bow. The Katana was used but not as popularly as it is seen. Using this ‘weapon of war’ the samurai armies would use them the slash at the enemies causing deep wounds and gashes on the enemy, forcing them to quit battle and retreat, after this they would then need medical help causing other soldiers to help them get to safety therefore resulting in less enemy for the samurai army to fight against, two birds with one stone.

The point of the Katana is called the ‘Kissaki’ and is the hardest part of the sword to polish and forge, to hand create a quality kissaki would require an extremely skilful artisan. In most circumstances, the value of the Katana is determined by the kissaki.  Samurais’ would also give names to their Katanas as they believed that their Katana lived their warrior spirit. The Katana is also the longest type of samurai sword compared to the other 2 measuring in generally around 24 inches, seconds was the Wakizashi measuring in between 12-14 inches, and then last was the Tanto which is basically just a small knife.

Also ‘shotgun’ was the name of the most powerful samurai rank; they would wear 2 samurai swords, a Katana and a Wakizashi. They also had a license to ‘dismember’ anyone who offended them.


MoodBoards and Reference Images
This is my first mood board that I created using Photoshop and gathered images from the internet that I could use to go towards my design and help me create my own Katana design. From these images I got an idea of colours and patterns to use for my own design.


Katana Designs

These are my Katana designs that I drew and designed in my sketchbook, for my final design I had a mix of both designs, for example I had the actual Katana from the first design and the sheath design from the seconds design, so it wasn't just one solid design I took parts from different designs and put them together. Some problems I encountered was that, I want sure about what sort of style of katana I wanted to make, to resolve this problem I sketched out a few ideas I thought of and decided which ones I wanted to use for my project. Some of the choices that I made for this part of the project was; I had to decide what sketches I wanted to use for ideas, I also had to decide  what sort of style I wanted my sketches to be.


14 Week Plan

Week
Session Activities
                  Personal Study Targets
1
Project introduction, Students working on producing their briefs.

Research / Planning / Proposal 
Create a mind map  and mood boards to create ideas for my project. Also start thinking about initial sketches to get an idea for my project.
2
Evidence gathering
Gathering Reference
Try and gather photos or images from the internet or primary sources to also use for ideas for my project. (Visit museums?)
3
All aspects of the my model, what I need to make.
Scene Breakdown
I need to think about all of the different assets of my model, like the blade, sheath, tsuba ect. I need to make, and how long it will take to make them.  I also need to also think about what sort of materials I need to use and how that will affect my texture.
4

Simple Block out
I will start in maya by placing a rectangle and making a basic blade model, and other assets of my katana. Like using a cylinder for the handle. This will then give a basic Idea of what I would like my katana to look like.
5

Modelling
I will make a very high detailed model also using Maya; I will do this by using basic shapes like the cube and the cylinder and modify them to fit my model. I will use a range of tools like the soft select tool for example to make a more realistic 3D model of my katana.
6

Modelling
7

Modelling
8

Uving
I will try and UV all of the assets of my model so they will be ready to texture. I will try and learn how to UV as I am still unsure about UVing and not very experienced with Maya. By this time I would have finished the modelling and move in to UVing as I need to finish the modelling to move further into the project. 
9

Uving
10

Uving
11

Texturing
I will texture the UV’s of my model with the color scheme I will decide in the future that fits my model well. I shall also give my katana a worn effect and try to represent this in the texture, as this is the sort of style I am going for in my model, a worn look. I need to have completed the UV ing stage to move on to the texturing, by this time I would have finished UV ing all of the assets to my model. 
12

Texturing
13

Unreal 4 / rendering
I will hopefully import my finished model into the Unreal Editor 4 and apply some screen effects to make it look more realistic and better than it already does in Maya. I will only move on to the Unreal Editor if I have completed all of the other stages to my project. By this time I would have completed all other stages in my project.
14

Finalization 
During the last week I shall go through all of my week and see if there are any improvements that need to be done.


PROJECT PROPOSAL

Student Negotiated Final Major Project


UAL Level 3 Diploma in Art & Design


THIS SECTION TO BE COMPLETED BY THE STUDENT


Student Name

Student Number

Adam Kingston

BMC141519876


Centre Name

Centre Number

Birmingham Metropolitan College

20313


Subject Specialism

Prop Modelling


Working Title or Theme of FMP

Katana


Number of words

Personal Tutor                                                   Course Leader

654


Chris Pearce


Signature

A.     Kingston


Date
22
02
16


Guidance

For your Project Proposal you must provide an outline brief of your Final Major Project. This brief will normally be of your own choosing. Where the brief is set by your tutor, or where you are working on a group brief (with other students) please make sure that you cover how you will respond individually to the brief and/or your individual responsibilities/contribution to the work of the group.


You should give careful consideration to producing a focussed outline brief:


Section One:
What is the title of your Project? What will you work towards producing and what is your proposed end point? Explain how this relates to your work and ideas and how it extends your knowledge, understanding and creative ability.


Section Two:
What are the influences, starting points and contextual references and why are they relevant to your ideas? Indicate the subject areas you intend to research and the likely sources of information including any museums, specific locations, performances, etc you plan to visit. However you should not make extensive lists in this section. Instead you should compile an accurate bibliography correctly acknowledging all references including texts, periodicals, websites and video/DVD’s etc. Enter your bibliography in the APPENDIX


Section Three:
Refer to any techniques and processes you intend to use. Describe the range of media and materials relevant to your project and how you may use them to explore and develop your ideas. Include aspects of studio practice, workshop procedures or the use of particular equipment and software etc. Provide an indicative timescale for your project and indicate the manner in which you intend to divide your time in order to investigate, develop, produce and evaluate your project appropriately. This should be a meaningful plan to you and should be personalised to your project. You may wish to write your plan as a daily or weekly schedule in which case enter your timescale in the APPENDIX. 


Section Four:
How will you critically review and analyse your work and determine if it is successful? How will you identify directions for ongoing development? Do you have a method to record the critical response to your ideas? How do you propose to assess the success of your Final Major Project and what will be your methods of evaluation? Unit 6 requires you to produce a supporting statement at the end of your project for your exhibition. This section can inform your analysis.


Your Project Proposal must be no less than 300 words and no more than 500 words.


SECTION ONE – The Final Major Project (guide 100 words)

For my Final Major Project, I will be designing and creating a katana which is a type of Japanese sword. I will start designing this by drawing concept designs and ideas in my sketchbook and also using Photoshop once I have an idea planned out, I will also experiment with colour to find the right colours I want to use for my final design of my katana. I will then use Maya and maybe Mudbox to create a realistic 3D model of my katana with high detail and then eventually add a custom texture that I will design myself using Photoshop.

SECTION TWO – Influences, Research, Sources and Ideas (guide 100 words)

The research I will conduct for this project will be research about katanas and how they are designed; I will use this to make my model as realistic as possible. The source I will use to conduct this search is the internet, as I feel this will provide the most information that will be helpful towards my project. I have an idea of going for a classical look with a wrapped handle but not sure about colours or other designs yet. I am also not sure about the sheath design either yet but I am going to design one along with the sword model. I want to design a katana for my Final Major Project because a katana is my personal favourite weapon of choice and I find this weapon very interesting with the way it was made/designed, also the reason why it was made the way it was, which have stated in my research. Therefore I chose to design a 3D model of a katana for my Final Major Project. By the end of this project I would like to have a highly detailed 3D model of a Katana with a custom texture and also rendered with lighting.

SECTION THREE – Techniques, Processes and Timetables (guide 150 words)

Some of the programmes I will use within this project are; Maya, Mudbox, Photoshop and maybe the Unreal Engine later in the project If I get time. Maya and Mudbox will be used to create my 3D model of my katana and also the sheath, Photoshop will be used for creating textures and also my final design, In Photoshop I will be drawing my final design using a Wacom pen and tablet to get the most accurate drawings possible, then the pen tool in Photoshop, also then using the paint brush to add the colour I have decided my katana to be.  Then later I will use Maya to render my Final piece then eventually if I have time I will try and render in the Unreal Engine, to add effects like post-processing to add realism. In Maya I will create my 3D model by using different objects like spheres, cubes and cylinders to put together and make my model. I will spend roughly 1 week on designs and drawings, then 2 weeks creating the actual 3D model, the about  1 week to create and apply a custom texture. After this I will then spend about 1 week rendering the final piece and tidying up any previous work in the project.

SECTION FOUR – Method of Evaluation (guide 150 words)

The Questions I will ask myself for the Evaluation of this project will be; What was my plan for the project? What did I want to make during this project? Was I successful in making it? What could I have done to further improve my work? And also what did I want to achieve at the end of my project and did I achieve it? Also is there anything I could have done better. Using these questions I will evaluate my project and reflect and review all my work I have created throughout the project.


APPENDIX – Use this appendix for your bibliography and/or action plan for your Final Major Project
For my research I will be using a range of references, for example I wall gather research from the internet, I will also try and take photos, I will also draw out sketches and use them for research. I will link all of these references in my bibliography.


Bibliography

Web Pages:


http://ezinearticles.com/?Samurai-Sword-Facts&id=54775 (n.d.). (Accessed March 15th 2016)


http://imgs.inkfrog.com/pix/artsfeng/tsuba_td02101.jpg (n.d.). (Accessed February 23rd 2016)

http://logonoid.com/images/v-ray-logo.png (n.d.). (Accessed May 2nd 2016)


http://porkpiesamurai.cgsociety.org/ (n.d.). (Accessed March 25th 2016)


http://www.boxingscene.com/martial-arts/48763.php (n.d.). (Accessed March 14th 2016)


http://www.porkpiesamurai.com/ (n.d.). (Accessed March 25th 2016)


https://en.wikipedia.org/wiki/Katana (n.d.). (Accessed 15th March 2016)


https://www.artstation.com/artist/dergaster (n.d.). (Accessed March 24th 2016)

https://www.artstation.com/artist/piotrnowacki (n.d.). (Accessed March 24th 2016)

https://www.artstation.com/artwork/katana-30 (n.d.). (Accessed May 2nd 2016)

https://www.artstation.com/artwork/rZ45L (n.d.). (Accessed May 2nd 2016

https://www.youtube.com/watch?v=Brh1JRL9OoY (n.d.). (Accessed April 26th 2016)

https://www.youtube.com/watch?v=HsUU-1EiH3U (n.d.). (Accessed April 24th 2016) 


TV Programmes:

The Walking Dead. (2010). FOX. October 31st  

Arrow. (2012). Sky1. October 10th 
MindMap

I created my mind map using Photoshop, explaining what I am going to create for my Final Major Project and different ideas that I have for the project. This mind map also has what sort of research I will do for my project and some different material that I could use for my katana.